
Importing Turbine Model
Greenwich turbine library collects turbine models from Envision and other turbine producers with their configurations. Select turbine model(s) suitable for your project. Besides, you can create turbine model series and turbine model directly in the project.
Importing Turbine Model from Turbine Library
Before importing turbine model into the project, ensure the turbine model you need is included in turbine library. If not, add turbine model series and add turbine models in advance.
- Click the project name in the project pane.
-
Click the select WT icon
 in the operation button area at the left bottom
of the interface. The Introducing turbine type page
opens.
in the operation button area at the left bottom
of the interface. The Introducing turbine type page
opens.
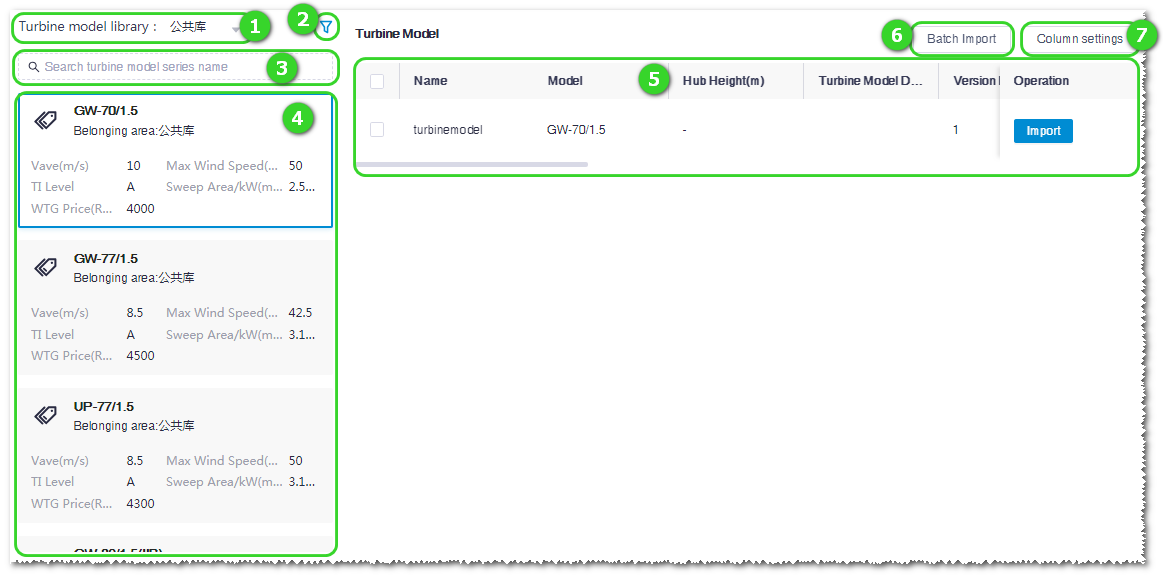
Table 1. Functional Areas on the Introducing turbine type Page No. Name Description ① Turbine library hierarchy Expand this menu and select a domain. All turbine model series under this domain are displayed in Area ④. ② Turbine series filter conditions Click this icon to open the Turbine model series filtration window, select filter conditions, and click Confirm. All turbine model series in accord with the selected filters are displayed in Area ④. 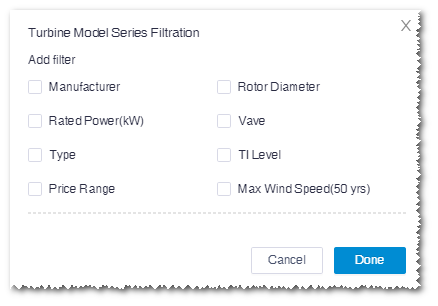
③ Turbine model series search Input the turbine model series name in the search box. All turbine model series with the searched name are displayed in Area ④. Fuzzy search is supported. ④ Turbine model series list All turbine model series in accord to the filters and conditions defined in ①②③ are listed. Each turbine model series tag shows its basic information. Click a turbine model series. Its turbine model information is shown in Area ⑤. ⑤ Turbine model table Show the turbine model(s) embedded in the selected turbine model series. Click the Import button to add the corresponding turbine model to the project.Note: After a turbine model is imported to the project, the button in the Operation column is displayed as Import again. Click the Import again button to add the same turbine model again.⑥ Batch import button This button is used to add multiple turbine models at one time: Select multiple turbine models in Area ⑤ and click this button. All selected turbine models are added to the project. ⑦ Column Settings button Click this button and select desired parameters in the expanded menu list to adjust the columns in Area ⑤.
Creating Turbine Model in the Project
The turbine model created in the project can only be used in the corresponding project but cannot be reused in other projects.
- Click the project name in the project pane.
-
Click the import/export icon
 in the operation button menu at the left bottom
of the interface. The Import/Export page opens.
in the operation button menu at the left bottom
of the interface. The Import/Export page opens.
- Select Turbine model in the Object Type menu. The turbine model series parameters as basic information and design wind condition are displayed.
-
Select the creation mode as Add manually.
Note: If you have any WTG file, select Import WTG file to create a turbine model series.
- Input the parameters in the basic information, design wind conditions, and name fields. Among them, the items marked with a red * are mandatory.
- Click the Create button. A turbine model series object is created under the selected project.
- Configure the turbine model series. Refer to the section Configuring Turbine Model Series for more information.
- Configure the turbine model, Refer to the section Turbine Model for more information.