Managing Your Account
After entering the Greenwich user center, check or modify the basic information and membership authority of the account.
This section is about how to enter user center, and function and operation on each page of user center.
Entering User Center
After you sign in, click your username at the right top of the homepage. The options available are displayed as shown in the figure below:

You are enabled to perform the following operations:
- Check your account balance.
- Click Recharge to enter the Recharge page. For more information about recharge, refer to the section Recharge.
- Click Account Management to open the User Profile page of user center to check the basic information of your account. For more information about user profile, refer to the section Account Management.
- Click Expense center to open the Account Overview page of user center to check the account balance, expense details, current package, etc. For more information about account overview, refer to the section Account Overview.
- (Optional) Click Sign Out to exit the account.
User Center
User center consists of two sections: account management and expense center.
Account Management
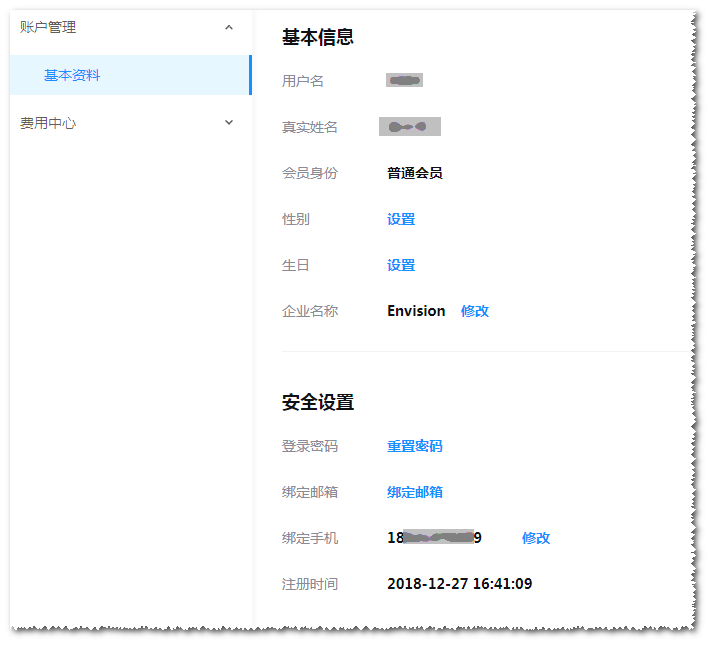
On the User Profile page, check and modify your basic information.

The available information includes username, real name, membership level, registration time.
Note
These items are not editable.
Note
To upgrade as premium member, refer to the section Membership Upgrade.
The following items can be modified or set up: gender, birthday, company name, password, registered phone number or email address, and bindable email address or phone number.
Expense Center
Expense center provides you with information and operation related to account balance and package. The details are listed as below:
Account Overview
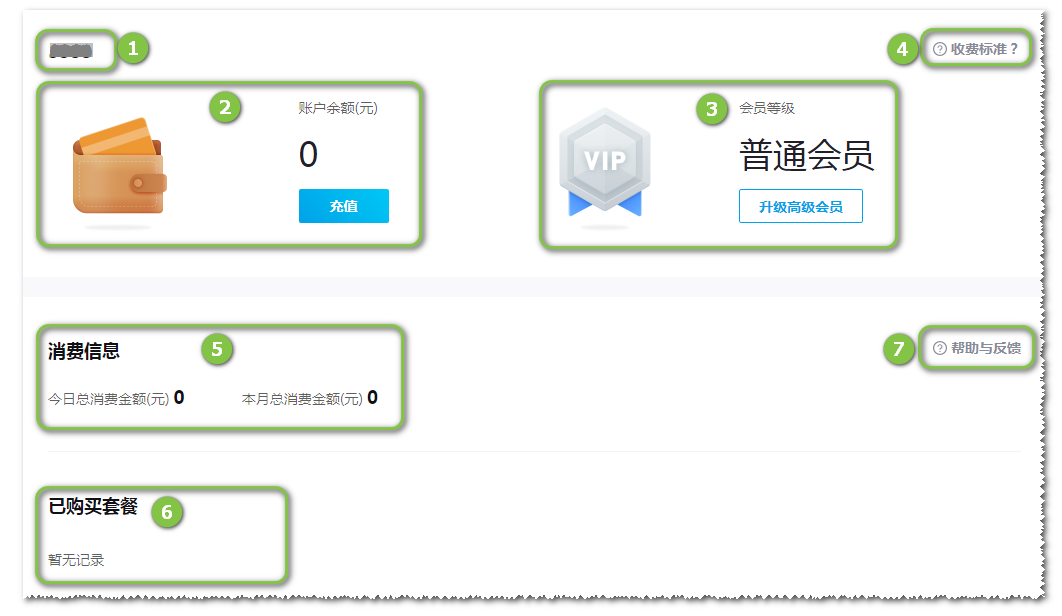
On the Account Overview pane, check the information of account balance, membership level, expense details, and current package.
Figure: Account Overview Page

| No. | Name | Description |
|---|---|---|
| ① | Account name | The username of current login account |
| ② | Account balance | Check current balance Click the Recharge button to open the Recharge page and recharge your account (refer to Recharge). |
| ③ | Membership level | Show current membership level When you upgrade to premium member, the VIP icon is lighted. Click the Upgrade button to open the Membership Upgrade page for upgrade (refer to Membership Upgrade). |
| ④ | Pricing standard | Click it to open the Pricing Standard page and check the introduction of product functions, pricing standard of each package, and authority of members (refer to Pricing Standard). |
| ⑤ | Expense overview | Show your expense of today and current month. |
| ⑥ | Purchased package | Show the purchase date and effective date of each of your package. |
| ⑦ | Help and support | Hover the pointer over this option. A message appears providing email address and phone number of Greenwich technical support team for solving problems you come across. |
Recharge
The Recharge page shows the balance of current account and account number of Greenwich bank account.
Only offline remittance to the Greenwich corporate account is supported. After you confirm the remittance has arrived, contact Greenwich customer service staff. The staff will charge your account with received amount after confirmation.
Membership Upgrade
On the Membership Upgrade page, you can upgrade as premium member from regular member. The upgrade steps are introduced as follows:
Select a charge mode.
Note
Currently, only Package I is available. So you need not select.
(Optional) Click Pricing standard to check the authority and charge standard of premium member.
Select the effective date of membership.
Read Greenwich terms of service, and select I have read and agree with Greenwich Terms of Service.
Click the Purchase button. The expense for membership upgrade is deducted from the account balance. If your balance is not enough, recharge your account.
After the upgrade is completed successfully, you are equipped with the corresponding authority.
Bill Check
On the Bill Check page, you can check the historical consumption and expense by month. The operation steps are introduced as follows:
- Select start month and end month. If you select more than one months, the bill of each selected month is listed in the table.
- Click the Search button, the bills are displayed by month in the table below. The columns in the table are:
- Month: month of the bill
- Content: package names used in the specified month
- Total expense: total expense in the specified month
Expense Record
On the Expense Record page, you can check the expense record of specified time range. The operation steps are introduced as follows:
Select start date and end date.
Select a username.
Note
In common cases, you can see contents only under your own account. If you want to share your project with other users, contact the Greenwich customer service staff to set up your specified accounts as shared. After that, more than one usernames are listed in the User name drop-down menu.
Click the Search button. All expense records within the specified date range are listed in the table below. The columns in the table are:
- Date: the time of consumption with accuration of second
- Username: username of current account
- Operation: the operations which produce expense, such as recharge, upgrade, calculation within package, etc.
- Status: status of the expense
- Expense: expense of the operation
Pricing Standard
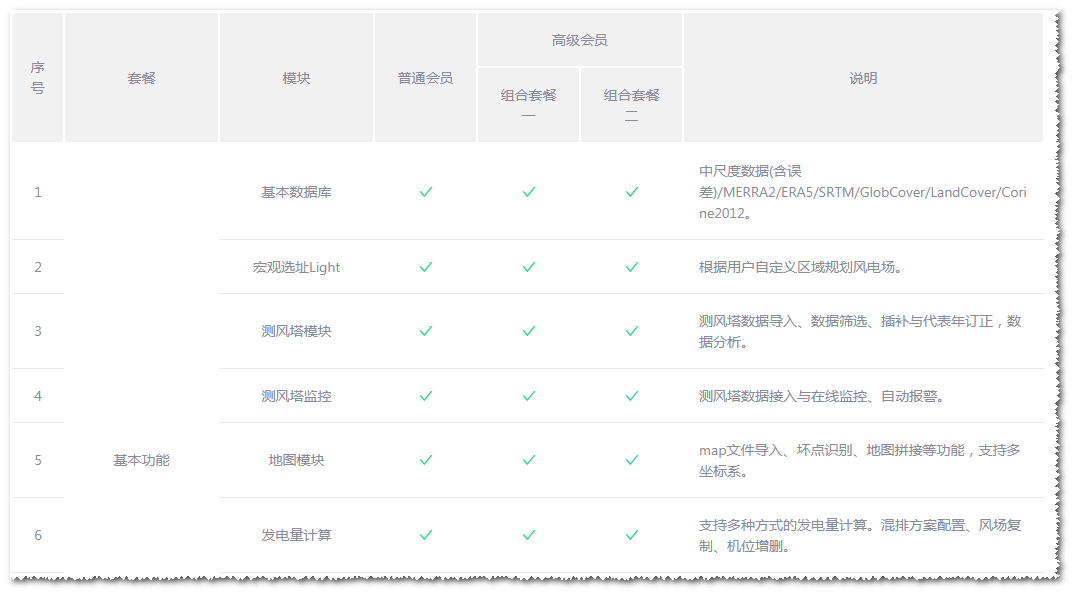
The pricing standard page introduces each function module of Greenwich, details of packages, pricing details, and authority of regular and premium member.
