Post-Assessment
The post-assessment introduced in this chapter is the assessment of wind farm early-phase investment by EBA calculation, providing references for future technology improvement and optimization.
EBA (energy-based availability) is the ratio of actual power generation to theoretical power generation. It is an objective system for wind farm assessment. For operating wind farms, the weight of various factors leading to power loss and EBA volatility is obtained from refined calculation supported by artificial intelligence and data mining technology in the EBA module. This evaluates the power capture and power loss level of different wind farms from an objective perspective, and helps wind farm owners define accurate KPIs.
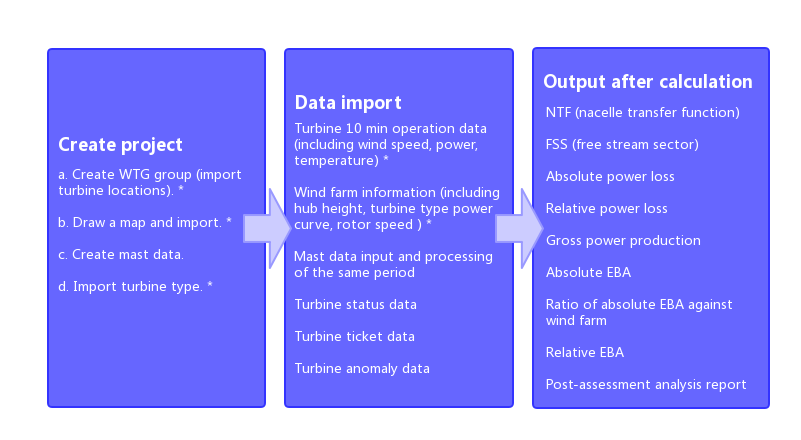
The post-assessment process is demonstrated in the following figure:

Note
The items with * are mandatory for EBA calculation. Get these data ready before the calculation.
Creating a Wind Farm
To calculate EBA, you should create a wind farm in the project, and import the objects relative with this wind farm, such as turbines, map, and masts.
Create a project for post-assessment. For details, refer to the section Creating a Project.
Create a wind farm in the project. For details, refer to the section Importing Turbine Layout.
Choose Database>Device Library>Turbine Library, and select the turbine models applied in this wind farm. For details, refer to the section Importing Turbine Model .
Note
In a wind farm, only one turbine model is allowed. If you need to assess a multi-turbine-type wind farm, create a separate wind farm for each turbine type.
Import a map. For details, refer to the section Importing a Map . If no map file is available, draw a map in Greenwich GIS. Refer to the section Creating a Terrain or Roughness Map based on Polygon for more information.
Import masts. For details, refer to the section Importing Mast Data .
Importing Turbine Operation Data
After the wind farm has been created, import the turbine operation data and match the data with the wind farm. These data is useful in the EBA calculation.
Importing Data Files
Acquire the turbine operation data file before importing data.
Click the WTG group object in the project tree.
Click the Data Matching button
 to open the Data Matching page.
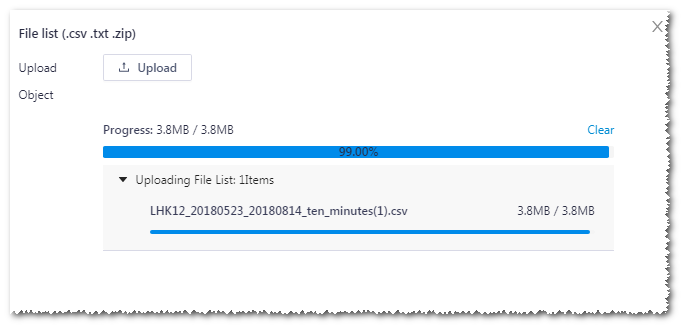
Click the Import Offline button. The data upload window opens.
Figure: Offline Data Import Window

Click the Upload button to upload the local turbine operation data, including ten-minute operation data, turbine state data, turbine malfunction data, and turbine ticket data.
After a data file is uploaded, click the Upload button again to continue upload other data files.
Note
The allowed formats of data files are .csv, .txt, and .zip.
Click the Close button after the upload is completed.
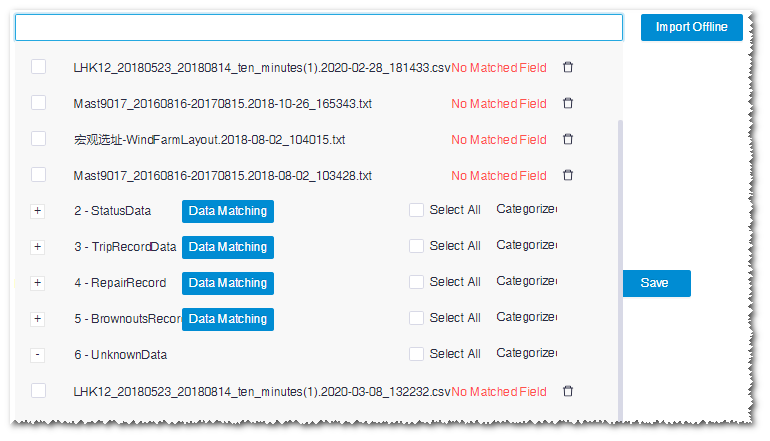
Click in the field at the right side of the Import Offline button to open the data file list.

All uploaded data files are categorized in the list with their data matching status. You can click the delete icon
 to delete the corresponding file.
The newly uploaded data are listed in the UnknownData column.
Click the check box before a data line to be matched, click Categorized to… in the UnknownData line, and select the data type in the drop-down menu list. Data type consists of operation data, status data, trip record data, repair record, and brownouts record.
Matching Data
Before data matching, import the effective turbine operation data and assigned the data type.
After you finish the data type assignment, click the Data Matching button at the right side of the data type you assigned to the data file. The data matching page appears.
Click the radio button before the data row to be matched. The data fields are displayed in the Matching Fieldcolumn in the table at the lower section of the interface.
Apply one of the following three methods to match the data fields:
Auto-match: Select Auto Match. The data fields to be matched are recognized and matched automatically.
Manual match: Drag an item in the Standard Field column to the Matched Field column to match it with that in the Matching Field column. Or select an item in the Matched Field column to match it with that in the Matching Field column.
Template match: Select a template from the Match Template drop-down list, which contains templates saved in the previous matching process or provided by the system.

The matched rows are displayed in grey, indicating the data match is completed. If you want to modify a match, click the red ˟ icon at the right top of the item in the Matched Field column to delete this match, and match it again.
To ensure the accuracy of data match, it is recommended to validate the matched fields after auto-match.
(Optional) When you complete data match, save the matched fields as a template for reuse.
a.Select Save Template.
b.Input a template name in the text box adjacent to this option.
Click the Save button to save the matched data and template.
If the Save Template option is not selected, only matched data are saved.
Matching Turbine Names
Complete data matching before you start to match turbine names. For details of data matching, refer to the section Matching Data .
After the data matching is completed, the turbine name matching page opens automatically.
Match the turbine names of the WTG Name column and the Matching WTG Name columnautomatically or manually. For details, refer to the section Matching Data .
To modify the data matching results, click Previous to go back to the data matching page.
Click Save to save the matched results.
Configuring Wind Farm Data
- Double-click the WTG group object in the project pane. The WTG group Overview page opens.
- Select turbine model series, turbine model, and hub height for turbines.
- Select ComponentGroup,RatedPower, and RotorSpeed in the Column Settings pane. They are added to the table. You need to configure the generator rated torque for the selected component group. For details of configuring component group, refer to the section Configuring Component Group .
- Modify the value of RotorSpeed when necessary. The default value is 10.
- Click the Save button.
Calculating EBA
When the data is ready, perform EBA calculation.
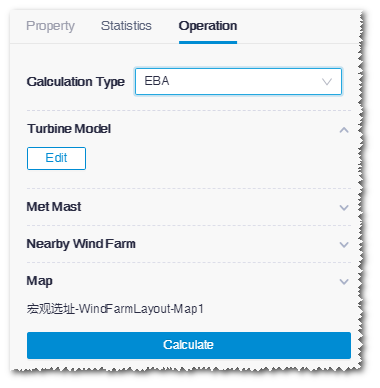
Click the WTG group object in the project pane. The operation pane opens.
Select EBA from the calculation type drop-down menu.

Select wind resource file, mast, nearby wind farm, and map.
Note
If there is any wind farm near this project, select nearby wind farm(s) to calculate the wake influence between the current wind farm and nearby wind farm(s). If no nearby wind farm exists, skip this part.
Click Calculate. After the calculation is completed, a message pops up: Data validated and saved successfully.
Checking EBA Report
After EBA calculation, the EBA report is available for export.
Double-click the WTG group object in the project pane. The WTG group Overview page opens.
Select parameters in the Column Settings pane to add them into the overview table.
Click the Export Table button to download the current table into the default download directory of your browser.
Click the Export Report tab.
Select Absolute EBA report and Relative EBA report as report type.
Absolute EBA report is only applicable in some specific conditions. The following items are included in the absolute EBA report: NTF, FSS, absolute loss energy, absolute EBA, and ratio of absolute EBA against wind farm.
Check the preview of the report at the lower part of the page.
Click the Export button to export the report into the default download directory of your browser.