- Documentation
- Greenwich Fundamentals
- Navigation Menu
- Project Menu
- Navigation Menu
Project Menu
The project menu is the project management area of Greenwich, including two views: the domain view and the project view. The domain view provides functionalities to create and manage projects, and the project view is for operating and setting up objects under the project.
The domain view shows all the domains, sub-domains, and projects within the domain in a domain tree. You can create a project, delete a project, or open projects within the domain tree.
The project view shows all the objects under the projects. You can classify the objects into folders created under the project for project management. Most of the operations related to projects and objects are performed in this project menu.
Creating a Project
Projects stores all the tasks done in Greenwich. When you first log into Greenwich, or need to start a new project, create a project under the domain view.
Log into the Greenwich platform, and view the Domain tree in the domain view.
The expand icon
 before the domain name indicates that it is expandable. Click this icon to show domains or projects in the next level.
Click the domain name to highlight it.
The operation buttons related to this domain displays at the bottom of the navigation menu. For more details about operation buttons, refer to Operation Buttons.
Click the Add button

The Create project page opens in the information demonstration area.
Input a project name.
Input the CRM.
Click Save to save the project.
The created project is added under the domain selected in Step 2.
Check the check box before the newly created project, and click the Open Selected Project button. This project is shown in the project view with the objects within its hierarchy.
Generally, a newly created project has no object within its hierarchy. You can add objects to it if necessary.
Deleting a Project
In the domain view, click to highlight a project name.
Click the Delete
 button at the bottom of the navigation menu pane.
A dialog box pops up, asking Confirm to delete? –<project name>.
Click OK to delete this project from the domain tree.
Managing Project Scheme
The project scheme management function provides the publishment, management, retrieve, and analysis of each decision point.
Note
This function is available only to the Envision internal users and invisible to external users.
Checking Scheme
The scheme checking function supports the checking, searching, and demonstration of schemes in the project.
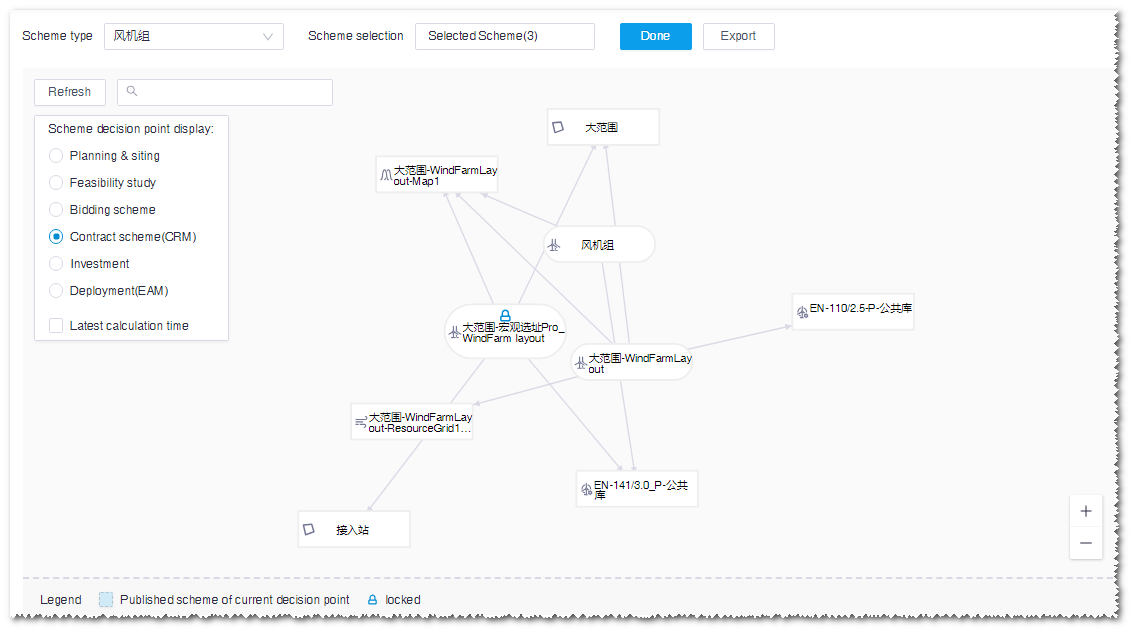
Double-click the project name in the project tree to open the project scheme publish page.
Select a type from the Scheme type drop-down list. Currently, only one option is provided.
Select scheme(s) in the Scheme selection drop-down menu. Select no more than 10 schemes.
Click Done. The selected scheme(s) and the associated objects are displayed.

The selected scheme is displayed with ellipse frame
The objects associated to schemes are displayed with rectangle frame
The scheme that has been publised in the current decision point is displayed in blue and is locked.
Note
If this scheme has been published in another decision point, it is locked but not in blue.
(Optional) Input a scheme name in the search box to search for desired schemes(s).
Select a decision point in the Scheme decision point display list. The scheme status of the selected decision point is accordingly refreshed in the scheme display area.
(Optional) Click the check box before Latest calculation time to show the lasted calculation time of each scheme below its name.
Publishing Scheme
This section introduces how to publish scheme and how to cancel the publishment.
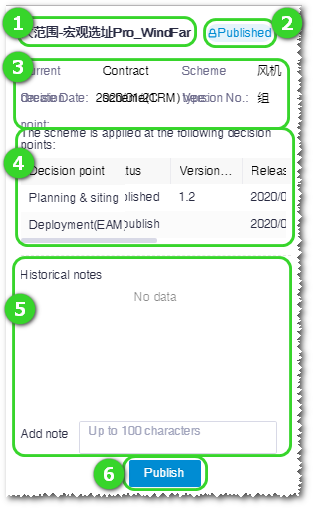
Click a project in the scheme display area. This project is highlighted with blue frame. The publish window pops up.

No. Description Function ① Scheme name Show the scheme name ② Sign of published status If this scheme has been published for any one decision point, the Published sign is displayed. If not, no sign is displayed. ③ Scheme information Show the decision point, type, creation date, and version No. of the scheme. ④ Publish record Show the publish record of this project in each decision point. ⑤ Historical notes Input note in the Add note field and it will be displayed in the Historical notes area after publishment. ⑥ Publish button Click this button to publish the scheme.
Note
To publish the scheme in the current decision point for the first time, the version number is set as 1.0 by default. If another scheme has been publised in this decision point, the second position of this version number is automatically added by 1 (such as 1.1).
Note
Before publishing a scheme in the Contract scheme (CRM) decision point, confirm that the CRM number has been set, the turbine models used in the scheme are all manufactured by Envision, and the PLM turbine model ID has been acquired from the data lake. If you are not able to acquire the PLM turbine model ID from data lake, contact the system administrator.
Note
To publish a scheme in any decision point, ensure that the scheme is not under calculation. If any object associated to this scheme is under calculation, confirm if you want to continue the publishment.
(Optional) Input the note.
Click the Publish button. After the scheme is published successfully, this scheme is locked.
(Optional) Cancel the publishment.
a.Click the scheme in the scheme display area to open the scheme publish window.
b.Click the Unpublish button to cancel the scheme publishment in the current decision point.
Note
This operation can be performed only by the scheme publisher.
Exporting Scheme
- Click the Export button to export the project property list of the selected scheme to the local download folder.
- Unzip the downloaded package and check the property list and layout file (kml) of each scheme.